Direct to Film is a print method that has been on-the-rise in the apparel decorating industries due to its high efficiency, low cost, and ability to increase any print shop's overall output. DTF combines both DTG printing and Heat Press to create high-quality, custom heat transfers to make production a breeze. Here, we're going to break it all down for you; the basic steps on how to achieve a top-notch DTF transfer, our tips & tricks, and everything in between! Keep reading to learn all that DTF has to offer, and get ready to unlock your printing potential!
First, let's cover the basics:
- What are the differences between DTF Printers, DTG Printers, DTF Transfers, and DTG Transfers?
Direct to Film (DTF) - This process is typically done with printers that print your artwork on film and are applied with a heat press.Direct to Garment (DTG) - This process is done when you print your artwork directly onto the apparel.DTG Transfers - This is the process we use in our videos. We are using A DTG printer with DTG ink to make transfers. Those transfers are applied with a heat press.DTG printers can make transfers BUT DTF printers CANNOT print directly on apparel.
- What is a heat transfer?
- Heat transfers are images printed on a plastic sheet of film that can be applied with a heat press on to apparel.
- Why are DTF Transfers a more productive choice for some orders over DTG or Screen Printing?
- With DTF, you can place and print multiple artworks on one sheet of film, thus decreasing the time spent going through the printing process for multiple items.
- They only need to be printed once, and then can be separated by each artwork and stored for use when needed.
- DTF Transfers can also be applied to a multitude of items, including those that are otherwise difficult to DTG or Screen Print.
Now, let's get into the good stuff!
Heat transfers are printed in reverse order of how DTG prints are made-- i.e. the CMYK layer is printed first, then the white under base is layered on top. Because of this, it is essential to mirror the artwork prior to exporting and opening in Garment Creator. Don't sweat it, we're here to walk you through it!
Printing Direct to Film Transfers:
- Place transfer film at the top-center of the t-shirt platen (we are using a 14x16 platen) with the matte side up and tape down edges.
KEY TIP: Mark off the center of the platen before placing films to make the printing process run smoothly.
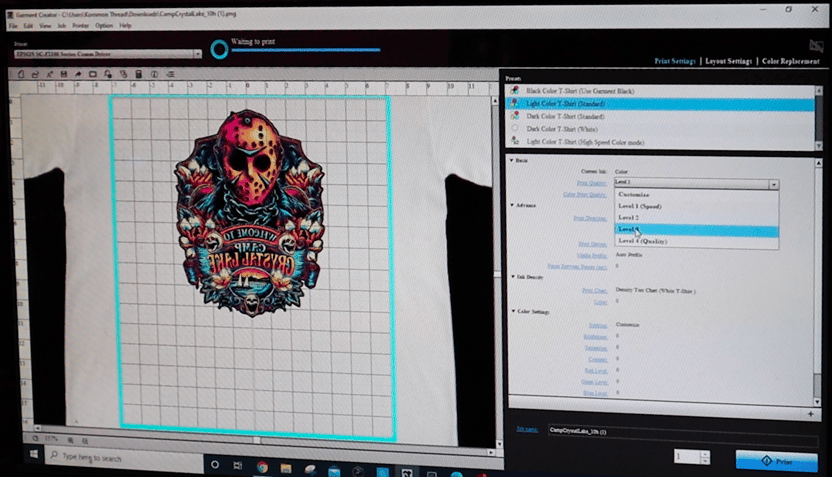
- Open the artwork in Garment Creator and print the first layer with print settings at:
- LIGHT COLOR T-SHIRT (Standard)
- PRINT QUALITY: LEVEL 3
- PRINT DIRECTION: UNI-DIRECTION
- After printing the first layer, let layer dry for several minutes (about 3-5 minutes) before printing the white layer.
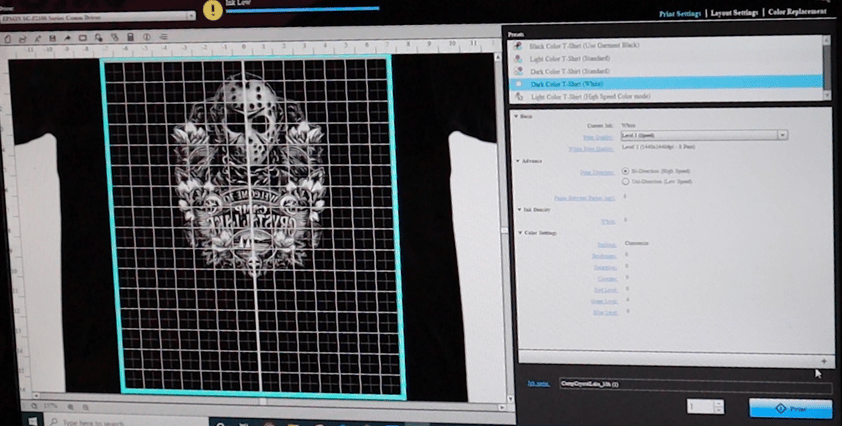
- Back in Garment Creator, print the white layer by changing the print color settings to:
- DARK COLOR T-SHIRT (WHITE)
KEY TIP: DO NOT move the artwork on the grid, this will affect where the print will land on the film and can ruin your transfers!
- DARK COLOR T-SHIRT (WHITE)
- Gently remove the tape from edges of film and place into a container suitable for coating the film with adhesive powder. KEY TIP: Always use adhesive powder in a well-ventilated or outdoor environment, and wear a protective face covering to prevent inhalation of the powder!
- Pour a generous amount of adhesive powder over the entire print and sift it around until the print is fully coated with powder. Save excess powder for future projects.
- Set the powder by placing the film under your heat press and hovering it for 3-5 minutes; the texture of the powder will look smoother and more settled.
- If necessary, cut out the individual prints and store any unused transfers in a cool, dry area for future use
Applying Transfers to Apparel:
- Place apparel on the appropriate heat press platen (standard shirt platen OR the Heat Press Kit)
- Place the transfer directly on to apparel in intended placement; tape down with heat transfer tape if desired
- Press apparel according to your heat press's suggested time and temperature settings.
KEY TIP: Our typical settings for most apparel types is 300 degrees F for 45 seconds. - After pressing, remove entire garment from the press BEFORE peeling away transfer film and let transfer cool down for about one minute.
- After the film feels cool to the touch, peel back starting from one corner and peel in one smooth motion.
KEY TIP: It is okay to peel film slowly, but DO NOT stop once the peel has started, as this can damage the print.
And just like that, you're done! Congratulations, you have successfully completed the entire DTF process!
Easy, huh? Like all forms of apparel printing and decorating, Direct to Film takes practice and attention-to-detail. But with this guide, we hope to make the process a bit easier for YOU!
Now that you have a key to unlock your printing potential, let's talk about Direct to Film's best friend; Print On Demand!
-------