Two of the most defining features of most hoodie styles are the large front pocket and the notched collar with drawstrings in the hood. They are what make hoodies such a classic cozy staple in every closet! However, if you have ever tried DTG printing on a hoodie, you know it's often a difficult, time-consuming process due to these design elements. For DTG, the apparel must be lying flat on the platen, with no obstructions on the print surface that could potentially disrupt the print or strike the printer head. The former will result in a ruined order and an unhappy customer, the latter will lead to expensive and lengthy repairs, resulting in an unhappy you. But, when you've got a platen specifically made with the unique print space of a hoodie in mind, you can tackle any order that comes your way with ease and peace of mind! Case en pointe: the 16x10 Platen + Locking Hoop that comes with the Ultimate Print Shop Package!
The Benefits
Aside from allowing you the ability to print on hoodies with ease in the first place, the 16x10 Platen + Locking Hoop has three main benefits:
- Because of the way the Locking Hoop keeps all seams, drawstrings, pockets, and collars out of the way and secured down, you are now able to print the entire available print surface area on the hoodie. The chest space on a hoodie is quite large, regardless of the actual tag size of the hoodie, and prior to the 16x10 Platen, we would get orders for prints that are too large for the allowable print space, and would have to turn the orders down. Now, this will no longer be an issue for any time you encounter the same scenario!
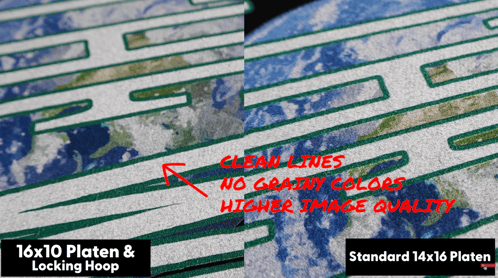
- With this platen, you do not have to compromise print quality by lowering the platen height, as the Locking Hoop takes care of any height sensor errors for you. This means that the overall image quality will sharp and optimized every time, leading to more satisfied customers!
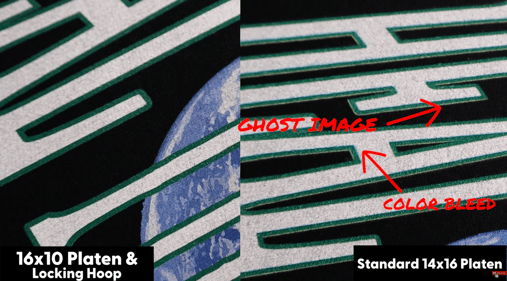
- The Locking Hoop comes to save the day again by keeping the hoodie secure for the entire duration of the time it is in the printer. This eliminates misprints caused by ghost images created when the hoodie shifts around as it is being printed. This occurrence happens often when using the tape method, but not anymore thanks to the 16x10 Platen's Locking Hoop!
What is the Tape Method?
If you have ever tried to print on a hoodie using the standard DTG platen that comes with your machine, you will have had to find workarounds on the dilemmas mentioned above; the hoodie not laying flat, pockets and collars in the way, having to lower the height check, you know what we mean. The tape method is when you use tape to try and work past these issues. It may get the hoodie printed, but not nearly as efficiently as it can be, and it takes a pretty significant amount of time to tape down and troubleshoot the individual hoodie. And when you've got a whole order of hoodies to be print, that time seriously adds up. On top of ending up with a passable, but not excellent, end-product, the cons of this method are certainly unavoidable to ignore. In the above video, the differences between the hoodie printed with the tape method vs. the 16x10 Platen are clear. With the 16x10 Platen + Locking Hoop, you get zero ghost images, the highest image quality possible, and it all happens in a snap! In other words, you need this solution for your shop!
How to Load and Use the 16x10 Platen + Locking Hoop
- Install the Master Adaptor on to your DTG printer
- Use the Master Adaptor's Loading Tracks to load the 16x10 Platen in place
- Thread the hoodie over the 16x10 Platen, you'll notice both the collar and the pocket fall off and out of the way of the print surface
- Place the Locking Hoop around the loaded platen and engage the locks on either side of the Hoop
- You're all set to print!
How to Aim the Artwork in Garment Creator
- Open your artwork in Garment Creator (we suggest sizing the artwork to slightly smaller dimensions than 16x10 prior to opening in Garment Creator)
- Change your platen size preset to the 16x20 setting
- Click the "center" button to automatically have your artwork aimed directly in the center of the platen
- Ensure your artwork is sized correctly by counting five inches (five grid boxes), up and down from the center line (the bolded vertical and horizontal lines at the center of the grid); as long as your artwork is within those bounds, it will aim perfectly on the hoodie!
- Choose the appropriate color and print direction settings for your garment, and you're all set to print!
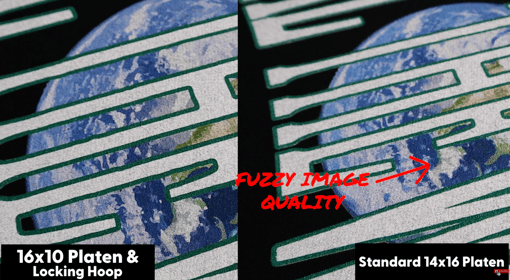
As you can see from the video, the differences between printing a hoodie with the standard 14x16 platen that comes with your machine and the 16x10 Platen + Locking Hoop are undeniable. With the Ultimate Print Shop Package, you will now be able to print a hoodie without the hassle of the tape method, at the highest quality possible due to avoiding height sensor errors, and at the biggest print size possible, all while saving valuable production time in the process! So, the next time you receive an order for hoodies, all you have to do is accept it!
-------
Learn more about the Ultimate Print Shop Package here!
Shop the Ultimate Print Shop Package!
Want to See More of These Products in Action? Schedule a Demo Session with Us!
Are You Signed Up for our Newsletter? Subscribe HERE for a Special Discount!